- OurPcGeek
- Posts
- How to Configure and Use Charles Proxy for HTTP/HTTPS Monitoring
How to Configure and Use Charles Proxy for HTTP/HTTPS Monitoring
Easy Guide To Install Charles Proxy
Your Guide to Installing and Setting Up Charles Proxy
Charles Proxy is an essential tool for developers that functions as an HTTP proxy, HTTP monitor, and reverse proxy. It allows you to view all HTTP and SSL/HTTPS traffic between your machine and the Internet. This includes requests, responses, and HTTP headers (containing cookies and caching information).
To get started, you can download Charles Proxy here.
Steps to Configure Charles Proxy
Follow these steps to install and configure Charles Proxy on your system:
Register Charles
Activate Charles Proxy by entering your license details.Install Charles Root Certificate
Go to Help → SSL Proxying → Install Charles Root Certificate.
Follow the prompts to install the certificate.

Select Local Machine
When prompted, select Local Machine and click Next.
Set Trusted Root Certification Authorities
Browse for the certificate and select the “Trusted Root Certification Authorities” option.
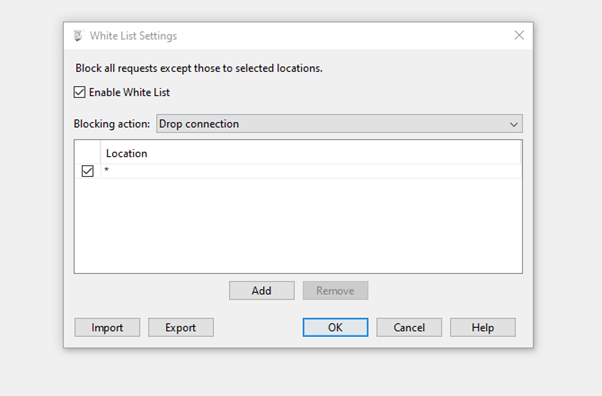
Whitelist Domains
Go to Tools → Whitelist to add the domains you want to monitor.
Enable SSL Proxy Settings
Go to Proxy → SSL Proxy Settings and configure the settings as needed.
Once configured, Charles should work seamlessly in the Chrome browser. However, you might face issues with Firefox or other browsers.
Troubleshooting Browser-Specific Issues
If Charles Proxy doesn’t work in certain browsers, follow these steps:
Windows / Internet Explorer
Quit Charles Proxy.
Open Internet Options from your Control Panel.
Navigate to the Connections tab → LAN Settings.
Uncheck the Use a Proxy checkbox.
Click OK to close all dialog boxes.
Mac OS X
Open System Preferences → Network Preferences.
Choose the active network port and click Configure.
Go to the Proxies tab and uncheck Web Proxy and Secure Web Proxy.
Click Apply Now and close the Network Preferences.
Firefox
Quit Charles Proxy.
Open Preferences → General Tab → Connection Settings.
Select Direct Connection to the Internet or configure proxy settings based on your network.
Click OK and close the Preferences window.
Final Notes
After performing the above configurations, Charles Proxy will monitor your HTTP/HTTPS traffic effectively. It’s a powerful tool for debugging network issues, monitoring requests, and optimizing web applications.
If you encounter any issues or need further help, leave a comment below.
Reply